# 源码解析四
上章说到 执行 compiler.run,那么这章就来看看 run 到底干了啥
# compiler.run
run 方法定义在 Compiler 类里面
run(callback){
    // ...
    const onCompiled = (err, compilation) =>{}
    this.hooks.beforeRun.callAsync(this, err => {
        if (err) return finalCallback(err);

        this.hooks.run.callAsync(this, err => {
        if (err) return finalCallback(err);

        this.readRecords(err => {
            if (err) return finalCallback(err);

            this.compile(onCompiled);
            });
        });
    });
}
上面 run 方法只要就是执行了 hooks.run.beforeRun.callAsync,如果未出现 异常 就执行 hooks.run.callAsync, 里面执行了 readRecords 方法,然后在回调里面执行 compile,我们再去这个函数看看具体做了什么
# compiler.compile
compile 是真正进行编译的过程,最终会把所有的原始资源编译为目标资源.实例化了一个 compilation,并将 compilation 传给 make 钩子上的方法,注册在这些钩子上的方法会调用 compilation 上的 addEntry,进行构建,代码如下:
	compile(callback) {
		const params = this.newCompilationParams();
		this.hooks.beforeCompile.callAsync(params, err => {
			if (err) return callback(err);

			this.hooks.compile.call(params);

			const compilation = this.newCompilation(params);
			this.hooks.make.callAsync(compilation, err => {
				if (err) return callback(err);

				compilation.finish(err => {
					if (err) return callback(err);

					compilation.seal(err => {
						if (err) return callback(err);

						this.hooks.afterCompile.callAsync(compilation, err => {
							if (err) return callback(err);

							return callback(null, compilation);
						});
					});
				});
			});
		});
	}
首先获取 compilation 所需的 params,也就是上面 看到的
const params = this.newCompilationParams();
具体就是如下:
newCompilationParams() {
    const params = {
        normalModuleFactory: this.createNormalModuleFactory(),
        contextModuleFactory: this.createContextModuleFactory(),
        compilationDependencies: new Set()
    };
    return params;
}
该方法里面分别返回一个 NormalModuleFactory,ContextModuleFactory 实例化的类,点进去发现都是继承 tapable,工厂对象顾名思义就是用来创建实例的,它们后续用来创建 module 实例的,包括 NormalModule 以及 ContextModule 实例。
# compilation
上面创建完 params 后继续调用 newCompilation(params) 创建 compilation 对象,代码如下:
newCompilation(params) {
    const compilation = new Compilation(this);
    compilation.fileTimestamps = this.fileTimestamps;
    compilation.contextTimestamps = this.contextTimestamps;
    compilation.name = this.name;
    compilation.records = this.records;
    compilation.compilationDependencies = params.compilationDependencies;
    this.hooks.thisCompilation.call(compilation, params);
    this.hooks.compilation.call(compilation, params);
    return compilation;
}
Compilation 对象是后续构建流程中最核心最重要的对象,它包含了一次构建过程中所有的数据。也就是说一次构建过程对应一个 Compilation 实例。在创建 Compilation 实例时会触发钩子 compilaiion 和 thisCompilation。

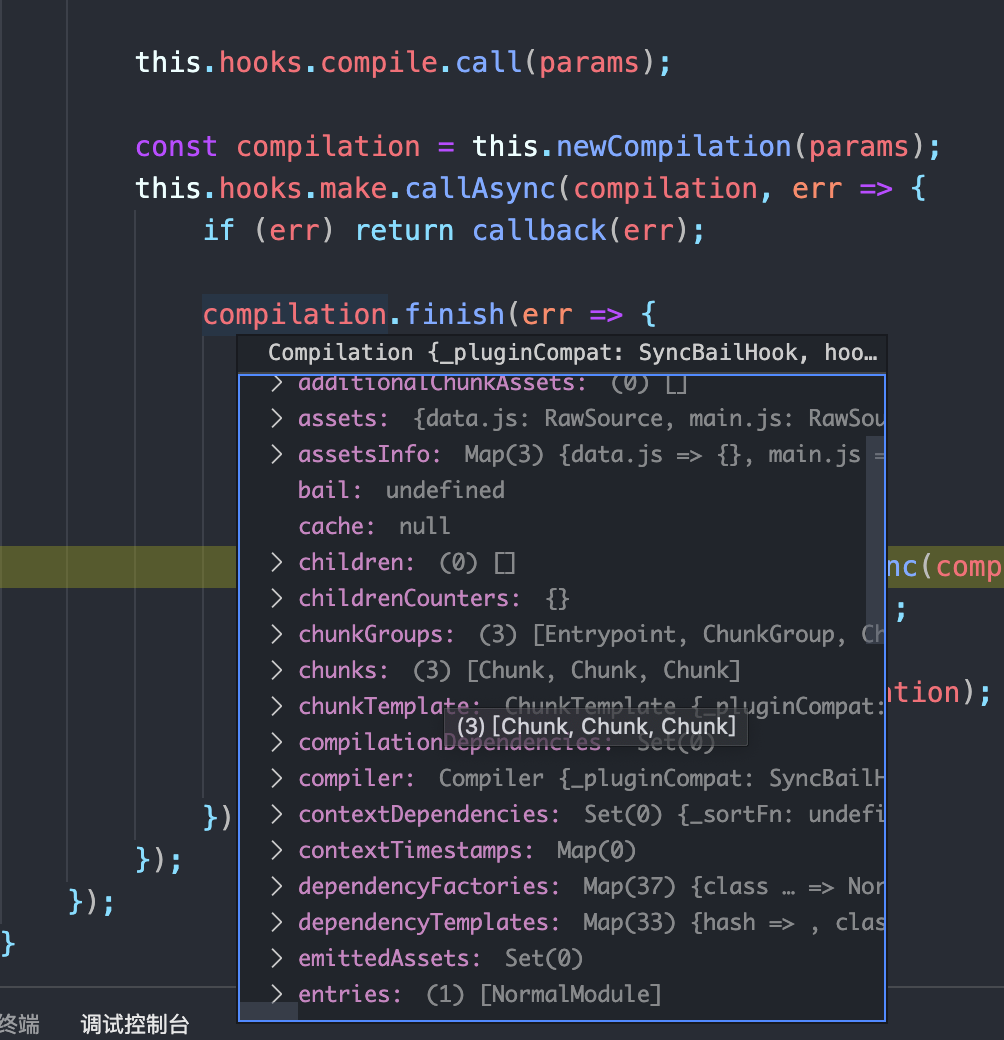
compilaiion 对面里面有很多属性,我们拿几个重要的属性来看看
- modules 记录了所有解析后的模块
- chunks 记录了所有的chunk
- assets 记录了所有要生成的文件
- entries 记录了打包文件的入口
通过断点我们可以清晰的看到 assets 记录的就是我们生成的代码资源,对应形式 为 chunk:code,但是 modules 中每个模块是啥对象,真不清楚.先不纠结,反正该步骤就是生成 Compilation 对象
# make
上面代码可以看到生成 compilation 实例后, this.hooks.make.callAsync 执行订阅了 make 钩子的插件的回调函数. 说实话,这个订阅让我一顿好找,最终在 webpack.js 初始化默认插件中找到了
// webpack.js 135 行
SingleEntryPlugin: () => require("./SingleEntryPlugin"),
SingleEntryPlugin.js
class SingleEntryPlugin {
	apply(compiler) {
		compiler.hooks.compilation.tap(
			"SingleEntryPlugin"
		);
		compiler.hooks.make.tapAsync(
			"SingleEntryPlugin",
			(compilation, callback) => {
				const { entry, name, context } = this;

				const dep = SingleEntryPlugin.createDependency(entry, name);
				compilation.addEntry(context, dep, name, callback);
			}
		);
    }
}
可以看到 这里订阅了 make,最后后执行了 compilation.addEntry 方法
# addEntry
好了,现在又回到了 compilation 里面,我们去找发现果然有个 addEntry 方法如下:
addEntry(context, entry, name, callback) {
    this.hooks.addEntry.call(entry, name);
    // ...
    this._addModuleChain()
}
可以看到,addEntry 调用了 _addModuleChain,这里面的逻辑就稍微多一些了
...
// 根据依赖查找对应的工厂函数
const Dep = /** @type {DepConstructor} */ (dependency.constructor);
const moduleFactory = this.dependencyFactories.get(Dep);

this.semaphore.acquire(() => {
    moduleFactory.create(
    {
        contextInfo: {
            issuer: "",
            compiler: this.compiler.name
        },
        context: context,
        dependencies: [dependency]
    },
    (err, module) => {
        ...
        const addModuleResult = this.addModule(module);
        module = addModuleResult.module;

        onModule(module);

        dependency.module = module;
        module.addReason(null, dependency);

        const afterBuild = () => {
            if (addModuleResult.dependencies) {
                this.processModuleDependencies(module, err => {
                    if (err) return callback(err);
                    callback(null, module);
                });
            } else {
                return callback(null, module);
            }
        };

        if (addModuleResult.build) {
            this.buildModule(module, false, null, null, err => {
                ...
                this.semaphore.release();
                afterBuild();
            });
        }
    }
);
});
上面的代码进行了部分节选,_addModuleChain 中接收参数 dependency 传入的入口依赖,然后在this.semaphore.acquire
this.semaphore 这个类是一个编译队列控制,对执行进行了并发控制,默认并发为 100,在实例化的时候可以看到,超过存入 semaphore.waiters,带入如下:
acquire(callback) {
    if (this.available > 0) {
        this.available--;
        callback();
    } else {
        this.waiters.push(callback);
    }
}
然后在其回调里面执行了 moduleFactory.create, 于是来到了 NormalModuleFactory.js
create(data, callback) {
    const dependencies = data.dependencies;
    // ...
    this.hooks.beforeResolve.callAsync(
        {
            contextInfo,
            resolveOptions,
            context,
            request,
            dependencies
        },
        (err, result) => {
            if (err) return callback(err);

            // Ignored
            if (!result) return callback();

            const factory = this.hooks.factory.call(null);

            // Ignored
            if (!factory) return callback();

            factory(result, (err, module) => {
                // ...
                callback(null, module);
            });
        }
    );
}
create 先触发了 hooks:beforeResolve.callAsync,然后在回调里又触发 hooks.factory,该事件返回一个 factory 函数,然后执行 factory 函数
this.hooks.factory.tap("NormalModuleFactory", () => (result, callback) => {
    let resolver = this.hooks.resolver.call(null);
    resolver(result, (err, data) => {
        // ...

        this.hooks.afterResolve.callAsync(data, (err, result) => {
            // ...
           createdModule = new NormalModule(result);
	        return callback(null, createdModule);
        });
    });
});
在 resolver 里面,先是执行了 hooks.resolver.call,进入内部注册hooks钩子的函数,最后得到这个一个对象:
callback(null, {
    context: context,
    request: loaders
        .map(loaderToIdent)
        .concat([resource])
        .join("!"),
    dependencies: data.dependencies,
    userRequest,
    rawRequest: request,
    loaders,
    resource,
    matchResource,
    resourceResolveData,
    settings,
    type,
    parser: this.getParser(type, settings.parser),
    generator: this.getGenerator(type, settings.generator),
    resolveOptions
});
之后再执行创建 module 并返回
let createdModule = this.hooks.createModule.call(result);
createdModule = this.hooks.module.call(createdModule, result);
return callback(null, createdModule);
# getParser
主要作用是为该 module 提供 parser,用于解析模块为 ast。
this.getParser(type, settings.parser) 创建 parser 并缓存。
执行 createParser,方法里触发 NormalModuleFactory.hooks:createParser for (type),该事件注册在 JavascriptModulesPlugin 插件,根据 type 不同返回不同的 parser 实例。
实例化之后,触发 NormalModuleFactory.hooks:parser for (type),会去注册一些在 parser 阶段(遍历解析 ast 的时候)被触发的 hooks。
# getGenerator
主要作用是为该 module 提供 generator,用于模版生成时提供方法。
与 parser 类似,this.getGenerator(type, settings.generator) 创建 generator 并缓存。
执行 createGenerator,方法里触发 NormalModuleFactory.hooks:createGenerator for (type),该事件注册在 JavascriptModulesPlugin 插件,根据 type 不同返回不同的 generator 实例(目前代码里都是返的一致的 new JavascriptGenerator() )。
实例化之后,触发 NormalModuleFactory.hooks:generator for (type)。
得到这个组合对象 data 后,跳出 resolver 函数,执行 resolver 函数回调,到此 resolve 流程结束,开启创建 module 流程!