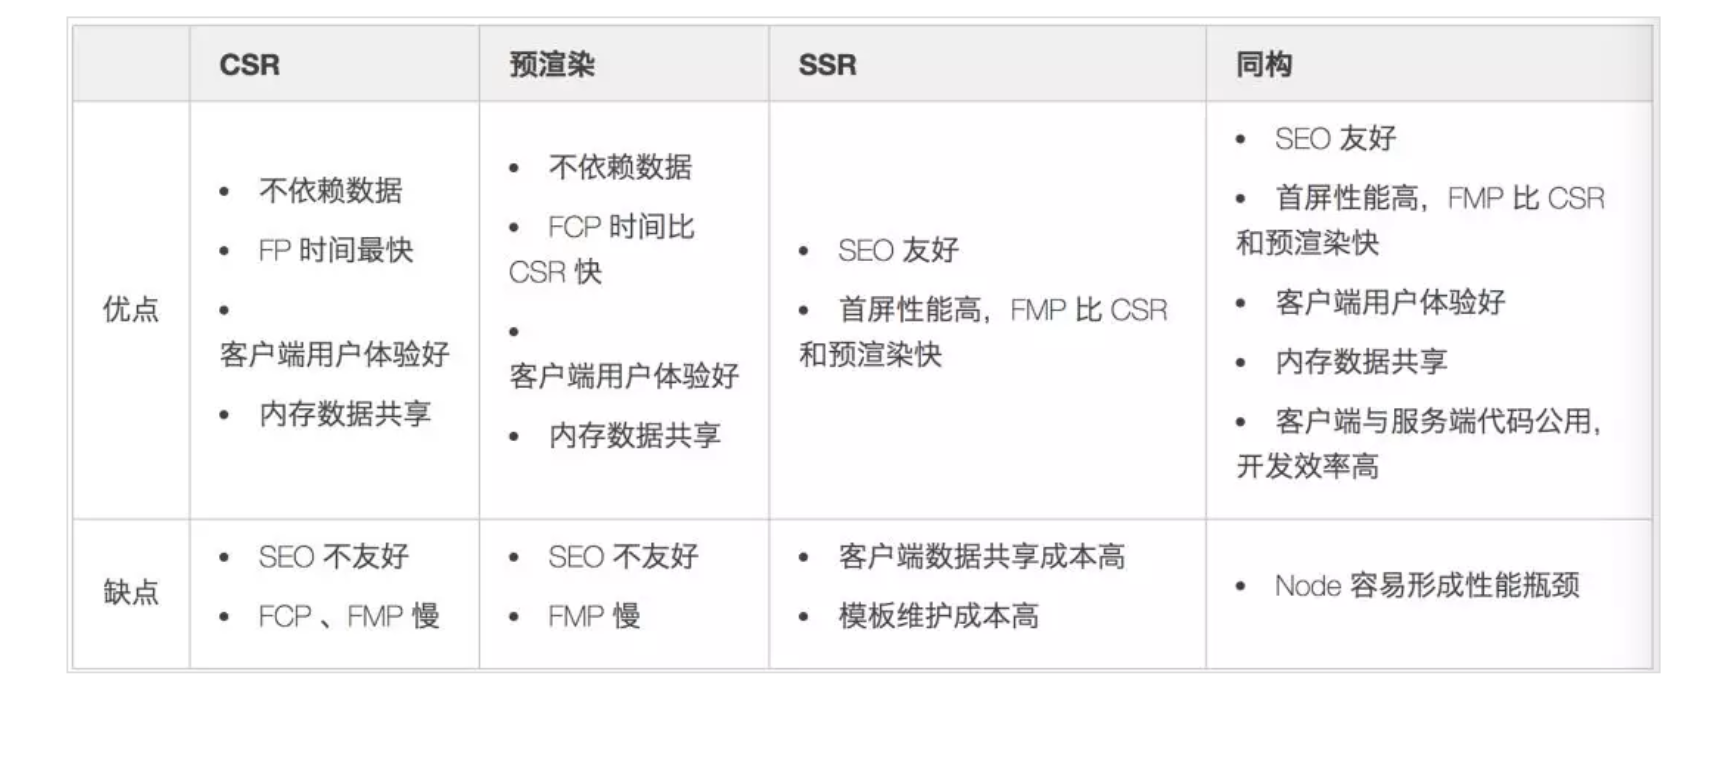
# 服务器端渲染(SSR)
- 更好的 SEO,由于搜索引擎爬虫抓取工具可以直接查看完全渲染的页面
- 解决首屏白屏问题
- 学习新技能
# 使用Node进行服务端渲染
# 同构
在服务端渲染 调用 React 的 服务端渲染方法 renderToString 但是无法绑定事件,我们需要在 里面再插入前端打包后的JS,我们需要将React代码在服务端执行一遍,在客户端再执行一遍,这种服务器端和客户端共用一套代码的方式就称之为同构
首先服务端调用 renderToString 渲染组件
import { renderToString } from 'react-dom/server'
const ele = renderToString(
    <StaticRouter location={req.url} context={context}>
        <Fragment>{renderRoutes(routers)}</Fragment>
    </StaticRouter>
)

const html = `<!DOCTYPE html>
    <html lang="en">
    <head>
    ...
    </head>

    <body>
        <div id="root">${ele}</div>
        <script src="/index.js"></script>
    </body>
    </html>
`
再在 body 里面插入 打包后的 JS
# 路由的使用
在客户端我们可以使用 BrowserRouter, 在服务端我们使用 StaticRouter
解决页面刷新后重定向问题
app.get('*', (req, res) => {
    ...
    <StaticRouter location={req.url} context={context}>
    ...
    </StaticRouter>
})
# 解决CSS
在服务端解析 CSS 解析使用 isomorphic-style-loader ,会有一个 _getCss 方法。
isomorphic-style-loader 提供了一个withStyles 高阶函数
import withStyles from 'isomorphic-style-loader/withStyles'
export default withStyles(styles)(App)
拼接CSS
在服务器端
const css = new Set() // CSS for all rendered React components
const insertCss = (...styles) => styles.forEach(style => css.add(style._getCss()))
<StyleContext.Provider value={{ insertCss }}>
   ...
</StyleContext.Provider>
把CSS 插入到 head
 <html lang="en">
    <head>
        <style>${[...css].join('')}</style>
    </head>

    <body>
        <div id="root">${ele}</div>
        <script src="/index.js"></script>
    </body>
</html>
在客户端
const insertCss = (...styles) => {
    const removeCss = styles.map(style => style._insertCss())
    return () => removeCss.forEach(dispose => dispose())
}
 <StyleContext.Provider value={{ insertCss }}>
 ...
 </StyleContext.Provider>
# 在服务端使用Redux
Redux 的时候和正常在客户端使用一样,但是要防止服务端 所有调用者引用同一个对象
// 每一次调用返回一个新的store,避免服务器端所有人都引用的同一个对象
export const getServerStore = (req) => {
    const middleWares = thunk.withExtraArgument(serverAxios(req));
    return createStore(
        reducers,
        applyMiddleware(middleWares)
    )
}
使用 Provider 进行连接
<Provider store={getServerStore(req)}>
    <StaticRouter location={req.url} context={context}>
        <Fragment>{renderRoutes(routers)}</Fragment>
    </StaticRouter>
</Provider>
# 在客户端使用
export const getClienStore = () => {

    // 如果服务器端已经产生了数据,就作为默认store使用 也就是脱水操作
    const defaultStore = window.REDUX_STORE || {};

    return createStore(
        reducers,
        defaultStore,
        applyMiddleware(thunk.withExtraArgument(clientAxios))
    )
}
这里使用到了脱水操作,后面再讲
<Provider store={getClienStore()}>
    <BrowserRouter>
        <Fragment>{renderRoutes(routers)}</Fragment>
    </BrowserRouter>
</Provider>
# 使用Axios 进行异步请求
这里使用到了 Node 作为中间件 转发数据
分为 client 和 server axios
Client
import axios from 'axios';

const instance = axios.create({
  baseURL: '/api',
});

export default instance;
import axios from 'axios';

const instance = req => axios.create({
    baseURL: 'http://localhost:8085/api',
});

export default instance;
配置 http-proxy-middleware 转发
app.use('/api', createProxyMiddleware({ target: 'http://localhost:8085', changeOrigin: true }));
如果在服务端相当于直接访问本地 Node 8085 服务, 在客户端我们发送请求 利用nginx 转发 到本地,再 利用 http-proxy-middleware 进行转发到别的服务器上,这里我们服务器就是本地
在服务端就行数据加载渲染
首先要匹配要那些页面, react-router-config 提供了 matchRoutes 方法
const matchedRoutes = matchRoutes(routes, req.path);
在需要数据预渲染路由添加 loadData 方法
{
    path: '/home',
    key: 'home',
    exact: true,
    component: Home,
    loadData: Home.loadData
},
在服务端执行 loadData 方法
matchedRoutes.forEach(item => {
    if (item.route.loadData) {
        const promise = new Promise((resolve) => {
            item.route
                .loadData(store, item.match.params, req.query)
                .then(resolve)
                .catch(resolve);
        });
        promises.push(promise);
    }
})

// 数据全部渲染完 返回html
Promise.all(promises).then(() => {
    const html = reder(store, req, res)
    res.send(html)
})
具体页面的操作
ExportHome.loadData = async store => {
    await store.dispatch(actions.getBlogList())
    await store.dispatch(actions.getHotBlog())
    await store.dispatch(actions.getTagList())
}
actions
export const getBlogList = (params = {}) => (dispatch, getState, axios) => axios.get('/blog/findAndCountAll', { params }).then(res => {
    dispatch(chanegState(constants.HOME_GETBLOGLIST, res.data.data))
})
# 数据注水和数据脱水
上面在使用 Redux 的时候我们提到了脱水,为什么要使用这个概念呢.
因为我们是 SSR 渲染,有些数据在服务端已经预先加载好,为了到客户端二次重新请求,就有了 注水 和 脱水的概念
获取服务端的 store
const store = getServerStore(req);
进行注水
const html = `<!DOCTYPE html>
    <html lang="en">
    <head>
    ...
    </head>

    <body>
        <script>
            window.REDUX_STORE = ${JSON.stringify(store.getState())};
        </script>
        <script src="/index.js"></script>
    </body>
    </html>
`
脱水操作
export const getClienStore = () => {

    // 如果服务器端已经产生了数据,就作为默认store使用 也就是脱水操作
    const defaultStore = window.REDUX_STORE || {};

    return createStore(
        reducers,
        defaultStore,
        applyMiddleware(thunk.withExtraArgument(clientAxios))
    )
}
# 使用 html-minifier 进行压缩
对得到渲染后的 html 节点 进行压缩
import { minify } from 'html-minifier';

const minifyHtml = minify(html, {
    minifyCSS: true,
    minifyJS: true,
    minifyURLs: true,
});
# 使用 react-helmet 管理 head信息
SEO 主要是针对搜索引擎进行优化,为了提高网站在搜索引擎中的自然排名,但搜索引擎只能爬取落地页内容(查看源代码时能够看到的内容),而不能爬取 js 内容,我们可以在服务器端做优化。
常规的 SEO 主要是优化:文字,链接,多媒体。
- 内部链接尽量保持相关性
- 外部链接尽可能多
- 多媒体尽量丰富 我们需要做的就是优化页面的 title,description 等,让爬虫爬到页面后能够展示的更加友好。
这里借助于 react-helmet 库,在服务期端进行 title,meta 等信息注入。
# Node 启用 Gzip
安装一个compression依赖
npm install compression
使用
var compression = require('compression')
var app = express();

//尽量在其他中间件前使用compression
app.use(compression());
# 总结
使用了 SSR 不得不说,页面渲染真的快了很多,白屏时间大大减少,但是这中间的 坑 真的不少,每一步都需要自己去折腾,一路下来,收获不少. 根据自己的需求合理的选择技术方案
最后附上地址
博客预览: - 博客地址
项目地址: -github
← Koa 集成 JWT BFF 架构初探 →